GlassFish4でWebsocket〜JSR 356〜
JSR 356 はJavaEE7で策定されるWebSocketを利用するための標準API。
そのEarly Draftを使って、NetBeansでサンプルを動かしてみる。
参考:
http://orablogs-jp.blogspot.jp/2012/10/websocket-applications-using-java-jsr.html
http://jcp.org/en/jsr/detail?id=356
- GlassFish 4.0 Promoted Buildをダウンロードしてインストール。
GlassFish 4.0 Promoted Buildのダウンロードはここから。
http://dlc.sun.com.edgesuite.net/glassfish/4.0/promoted/
インストール時の画面やインストール先のディレクトリにはGlasFish3と出るが、気にせずインストール(インストール先のディレクトリはGlassFish4にしておくと分かりやすい)。
インストールした後は、(現在の最新バージョンであるGlassFish4.0 build 60時点では管理画面が動かないので)asadminコマンドでwebSocketを有効にする。
asadmin set configs.config.server-config.network-config.protocols.protocol.http-listener-1.http.websockets-support-enabled=true
- NetBeansにGlassFish4を追加し、プロジェクトを作成する。
左メニューのサービスタブをクリック。サーバーツリーを右クリック→サーバーを追加 でインストールしたGlasFish4を選択する。
ファイル→新規プロジェクト→Maven→Webアプリケーションを選択。サーバーに先ほど追加したGlassFish4を指定する。
pom.xmlにWebSocketのdependency↓を追加してビルド。
        <dependency>
            <groupId>javax.net.websocket</groupId>
            <artifactId>javax.net.websocket-api</artifactId>
            <version>1.0-b06</version>
            <type>jar</type>
        </dependency>
        <dependency>
            <groupId>org.glassfish.websocket</groupId>
            <artifactId>websocket-api</artifactId>
            <version>0.2</version>
            <scope>provided</scope>
        </dependency>
- クラスと画面を作る。
WebSocketの処理を行う次のクラスを作る。
現在の仕様では@WebSocketEndpointアノテーションからpath属性が無くなり、文字列だけでpathを指定できるようになっている。
package org.example;

import javax.net.websocket.annotations.WebSocketEndpoint;
import javax.net.websocket.annotations.WebSocketMessage;

/**
 *
 * @author masayasu
 */
@WebSocketEndpoint("/hello")
public class HelloWorld  {

    @WebSocketMessage
    public String sayHello(String name, Session session) {
        return session + ": hello " + name;
    }
}
画面はHTML5で作成。新規作成ウィザードからindex.htmlを作成する。
接続先のURLはプロジェクトのコンテキストパス(プロジェクトを右クリック→実行で表示される)に合わせて修正する。
( var host = "ws://localhost:8080/(ここにコンテキストパスを指定する)/hello";
index.html
<!DOCTYPE html>
<html>
<head>
<script src="http://code.jquery.com/jquery-1.7.2.min.js"></script>
<script type="text/javascript">
$(document).ready(function() {
var socket;
var host = "ws://localhost:8080/webSocket-study/hello";
try{
socket = new WebSocket(host);
message('<p class="event">Socket Status: ' + socket.readyState);
socket.onopen = function(){
message('<p class="event">Socket Status: '+socket.readyState+' (open)');
}
socket.onmessage = function(msg){
message('<p class="message">Received: '+msg.data);
}
socket.onclose = function(){
message('<p class="event">Socket Status: '+socket.readyState+' (closed)');
}
} catch(exception){
message('<p>Error'+exception);
}
function send() {
var text = $('#text').val();
if(text==""){
message('<p class="warning">Please enter a message');
return ;
}
try {
socket.send(text);
message('<p class="event">Sent: '+text)
} catch(exception){
message('<p class="warning">');
}
$('#text').val("");
}
function message(msg){
$('#chatLog').append(msg+'</p>');
}
$('#text').keypress(function(event) {
if (event.keyCode == '13') {
send();
}
});
$('#disconnect').click(function(){
//socket.close();
});
});
</script>
<meta charset=utf-8 />
<style type="text/css">
body{font-family:Arial, Helvetica, sans-serif;}
#container{
border:5px solid #808080;
width:800px;
margin:0 auto;
padding:10px;
}
#chatLog{
padding:5px;
border:1px solid black;
}
#chatLog p{margin:0;}
.event{color:#999;}
.warning{
font-weight:bold;
color:#CCC;
}
</style>
<title>Hello World</title>
</head>
<body>
<div id="wrapper">
<div id="container">
<h1>WebSocket Hello World</h1>
<div id="chatLog">
</div>
<p id="examples">Type your name and press <enter></p>
<input id="text" type="text" />
<button id="disconnect">Disconnect</button>
</div>
</div>
</body>
</html>Webページを右クリック→新規→標準のデプロイメント・ディスクリプタでWEB-INF/web.xmlを作成。web.xmlの
web.xml
<?xml version="1.0" encoding="UTF-8"?>
<web-app version="3.0" xmlns="http://java.sun.com/xml/ns/javaee" xmlns:xsi="http://www.w3.org/2001/XMLSchema-instance" xsi:schemaLocation="http://java.sun.com/xml/ns/javaee http://java.sun.com/xml/ns/javaee/web-app_3_0.xsd">
    <session-config>
        <session-timeout>
            30
        </session-timeout>
    </session-config>
    <welcome-file-list>
        <welcome-file>index.html</welcome-file>
    </welcome-file-list>
</web-app>
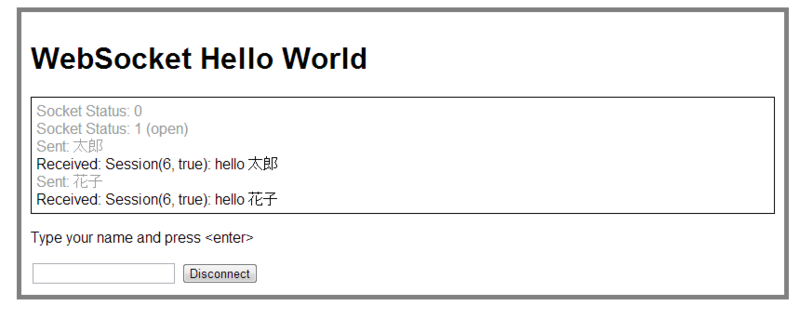
プロジェクトを右クリックからビルドし、実行するとブラウザが開かれ、nameを入力してenterキーを押すと画面にSessionの内容+":hello "+入力したnameが表示される。

JSR 356 のAPI Docはhttp://jcp.org/en/jsr/detail?id=356のDownload pageをたどるとダウンロードできる。
RESTful APIのJAX-RSと同じようにpathの一部をパラメータとして渡せる。